Valentine’s Day Cheesecake
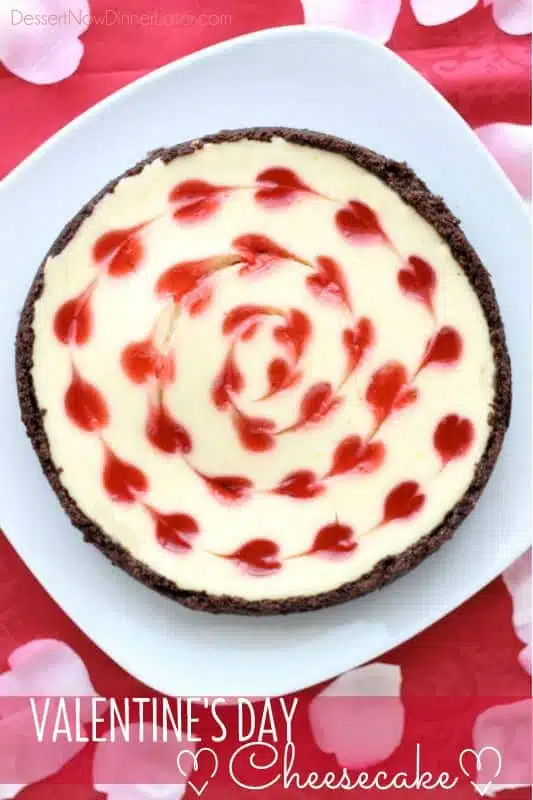
Heart shaped swirls in this Valentine’s Day Cheesecake are easy to make and beautiful to look at. This delicious valentines dessert is sure to impress your special someone.
Why You’ll Love This Recipe
I am so beyond excited to share today’s recipe with you all! This Valentine’s Day Cheesecake makes me giddy! It’s cute, it’s creamy, it’s fruity, and it’s chocolatey. There are not enough words to tell you how delicious and fun this cheesecake is!
We absolutely love the chocolate and strawberry combo in this valentines dessert.
Save This recipe
Enter your email below to get a link to this recipe emailed straight to you to save later! Plus be signed up for all new recipes.
Basically, you should head to the grocery store and make this Valentine’s Day Cheesecake for your lover…or your kids…or yourself. There is no shame in baking and eating a whole cheesecake all to yourself.
I mean, I practically ate this whole thing, but I did let my kids have a couple bites. Okay they each got a small slice, but I won’t look down on you for wanting the whole thing.
Valentines Cheesecake Components
There are 3 main components to this heart shaped cheesecake. They are:
- Chocolate Graham Cracker Crust
- Creamy Vanilla Cheesecake Filling
- Strawberry Purée Hearts
I’ll show you exactly how to put it together.
Make the Chocolate Crust
*NOTE: Full ingredient amounts and instructions are in the printable recipe card at the bottom of the post.
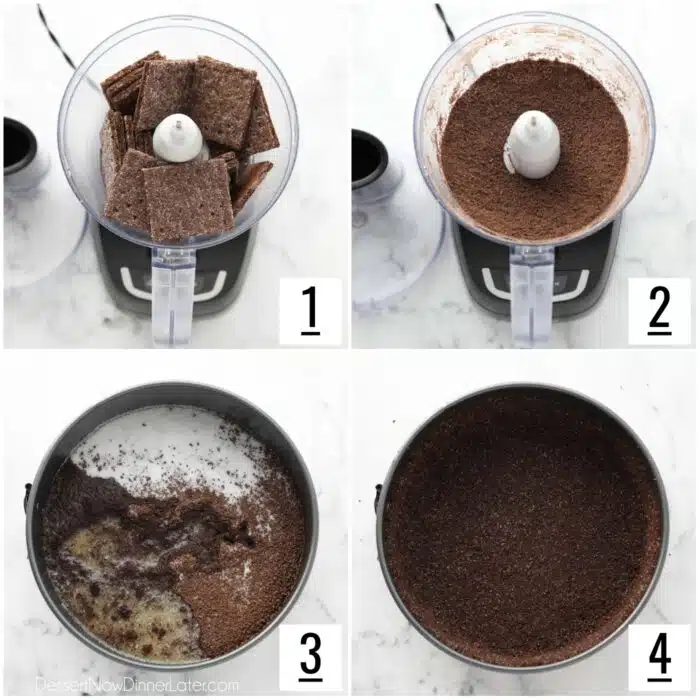
- Pre-heat oven to 350˚F. Place the chocolate graham crackers in a food processor.
- Pulse the chocolate graham crackers until fine crumbs.
- Empty crumbs into an 8-inch springform pan. Add the sugar and melted butter.
- Mix together until all the crumbs are wet, then press onto the bottom and 1½ inches up the sides of the pan. Bake at 350˚F for 12 minutes. Remove from oven and set aside to cool. LOWER THE OVEN to 280˚F.
NOTE: Chocolate graham crackers might be tricky to find. I get mine at my local Kroger store (Smith’s) but you could substitute chocolate wafer crumbs as well.
Make the Strawberry Puree
While the crust cools, prepare the strawberry puree.
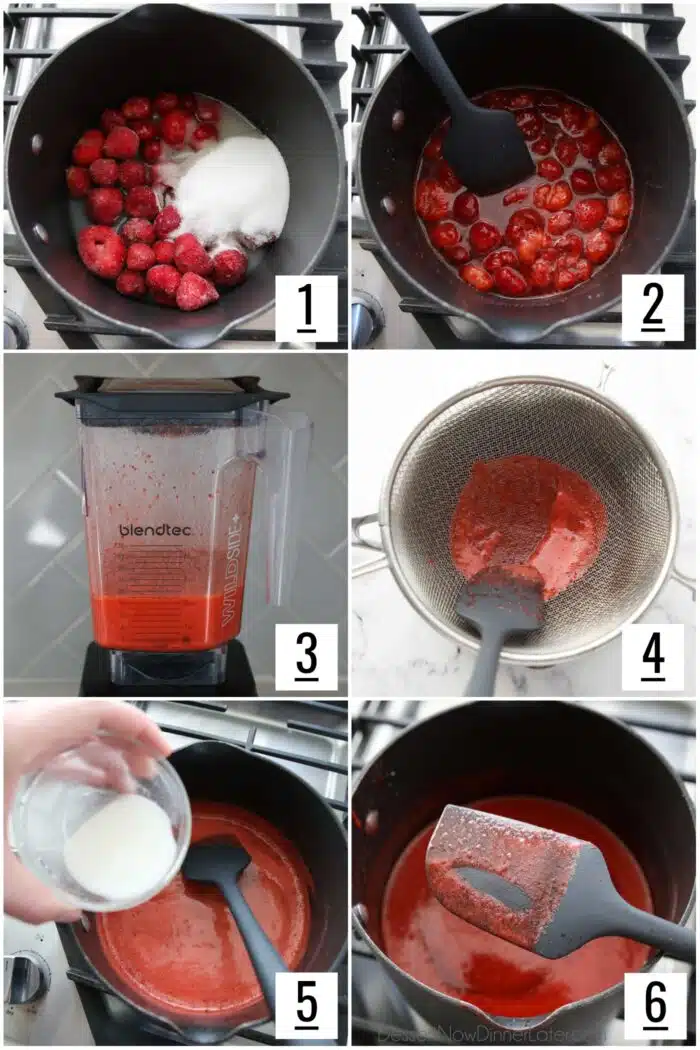
- In a medium saucepan, cook the strawberries, sugar, and lemon juice over medium heat, stirring frequently.
- Cook until it’s starting to boil, the strawberries are soft enough to break up with a spatula, and the sugar is dissolved.
- Transfer the strawberry mixture to a blender and process until smooth.
- Strain the mixture over a wire sieve back into the pot. Continue cooking over medium heat, stirring frequently.
- In a small bowl, combine the cornstarch and COLD water, creating a slurry. Wait until the strawberry puree comes to a boil, then stir in the cornstarch slurry.
- Let it come to a rolling boil and thicken up, stirring constantly. Remove from heat and place the saucepan on a hot pad in the fridge until cool to the touch.
NOTE: This strawberry puree would also be great for cakes and other desserts as well as mixing into sodas and mocktails.
Make the Cheesecake Filling
While the strawberry puree cools down in the fridge, make the cheesecake filling.
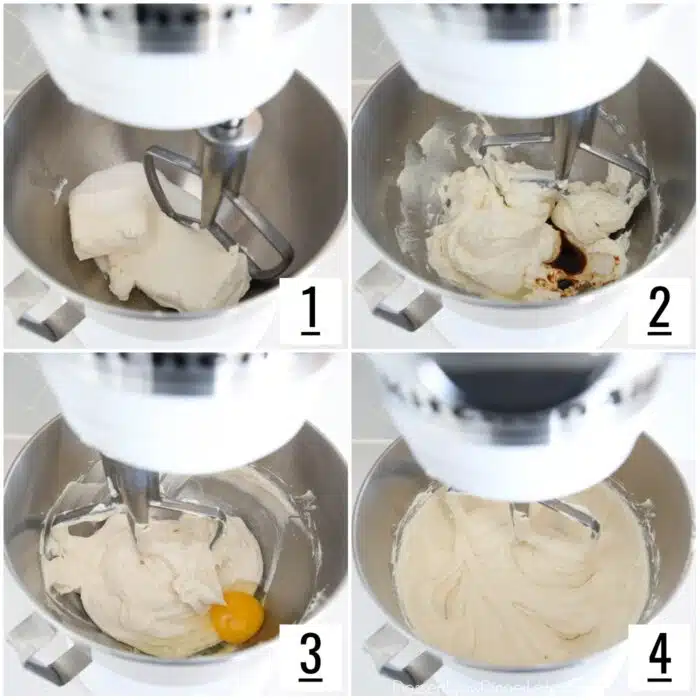
- Using an electric stand mixer with the paddle attachment, beat the cream cheese and sugar together until creamy and smooth. Scrape the bowl.
- Add the sour cream, lemon juice, and vanilla. Mix again until smooth and fully combined, scraping the bowl as needed.
- Add the egg.
- Mix until well combined.
Assemble the Valentine’s Day Cheesecake
The thing that really makes this cheesecake perfect for Valentine’s Day is the heart swirl pattern. And it’s easier to make than you think!
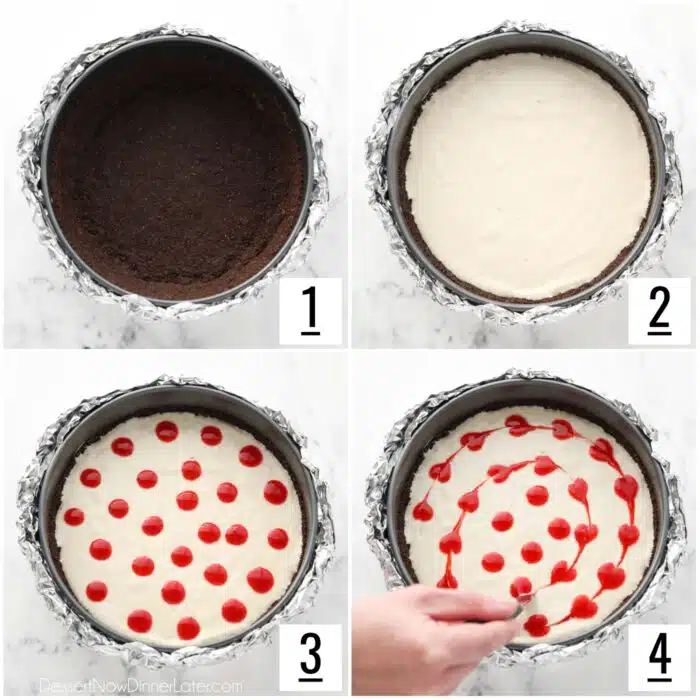
- Prepare cheesecake for baking in a water bath by wrapping the outside of the springform pan with a double layer of heavy duty foil.
- Spread the cheesecake batter into the chocolate crust. Gently jiggle and tap the pan to even out the top and release any air bubbles.
- Pour the strawberry puree into a squeeze bottle with a tiny tip. Drop small dots an inch or so apart in a spiral pattern over the cheesecake batter. Piping larger dots on the outside, and smaller dots as you go in towards the middle. (Save the extra strawberry puree for serving.)
- Take a toothpick or sharp pointy knife and drag it through the center of each circle in the same spiral pattern. Be careful NOT to lift the toothpick or knife until you have finished the very last circle. (I started with the outside and worked my way to the middle.)
Ta-da! Hearts!
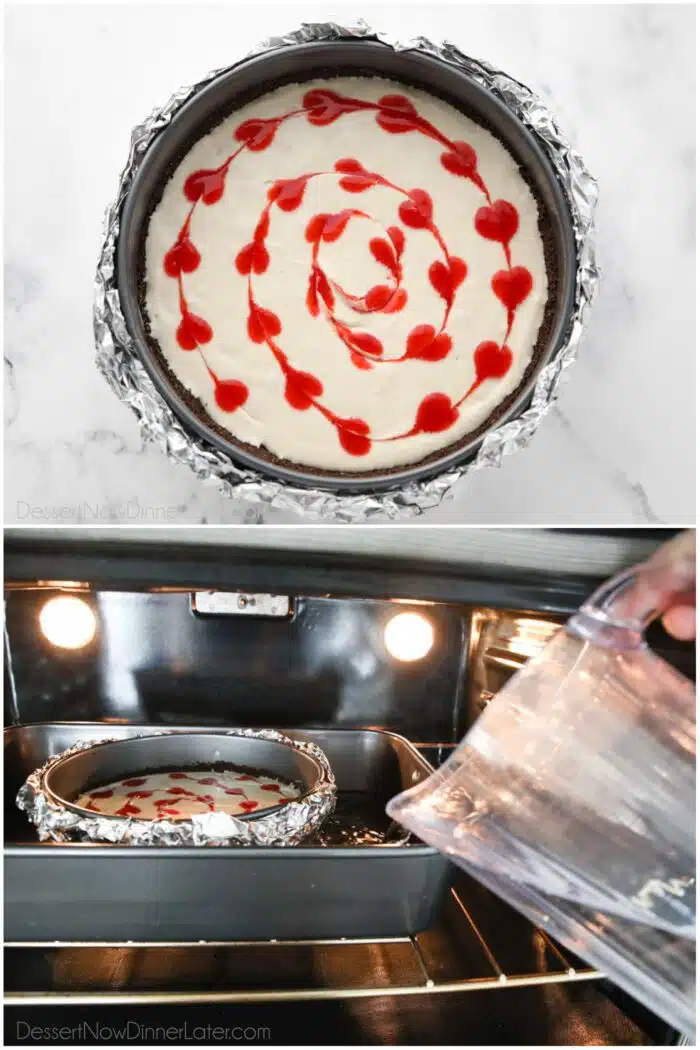
- Place the cheesecake into a slightly larger roasting pan or baking dish and place it in the oven. Carefully pour hot water halfway up the sides of the springform pan.
- BAKE at 280˚F for 55-60 minutes, until the top looks dull/matte and is slightly puffed up. DO NOT OPEN THE OVEN. Turn the oven off and keep the cheesecake in there for 2 hours.
- Remove cheesecake from oven, take the foil off the pan and let it finish cooling in the refrigerator for 2+ hours.
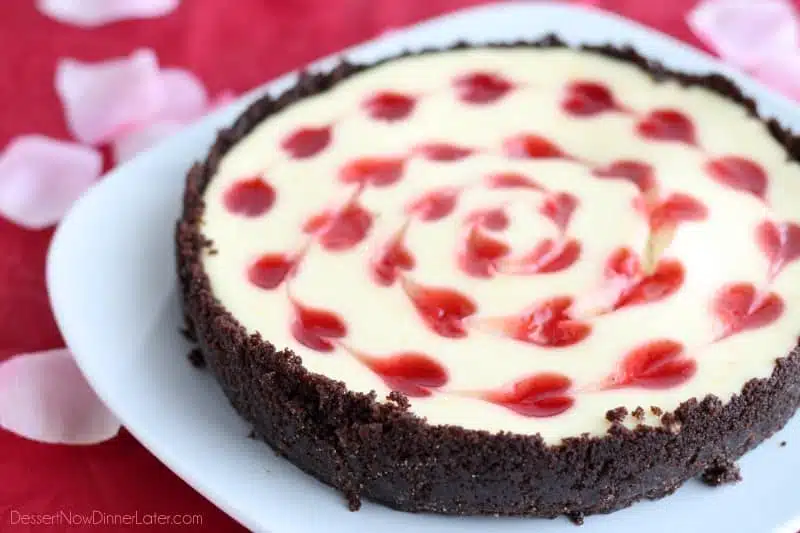
Serving and Storing
- Once chilled, cut the cheesecake with a hot, dry knife for crisp, clean slices.
- Be sure to serve this Valentines Day Cheesecake with the extra strawberry puree. You can spread or pipe some on the plate and then set the cheesecake on top of it. You don’t want to cover those beautiful hearts you made.
- Store cheesecake covered lightly with plastic wrap in the refrigerator for up to 7 days.
- To freeze, double wrap the cheesecake with plastic wrap onto a cardboard round or freezer-safe plate and then wrap with a layer of foil. Freeze up to 3 months. Thaw in the refrigerator overnight. NOTE: Strawberry hearts may crack upon freezing/thawing.
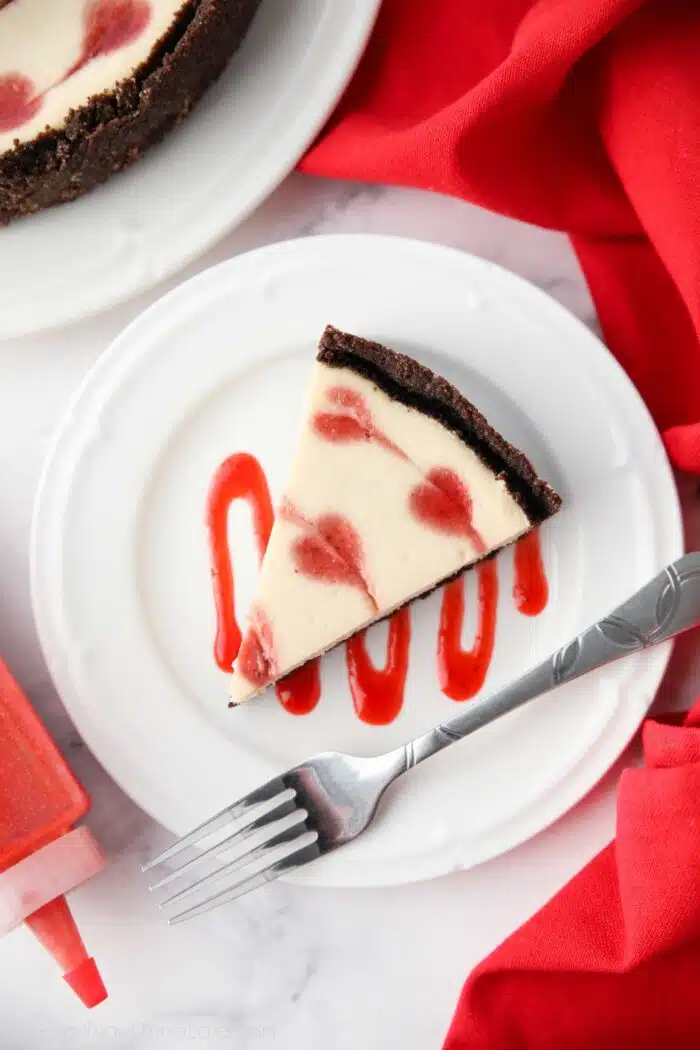
Cracked Cheesecake Hearts?
If you follow me on instagram you might recognize this next picture. Want to know why it looks perfect and then all my pictures above have cracks? I am so bummed about it actually.
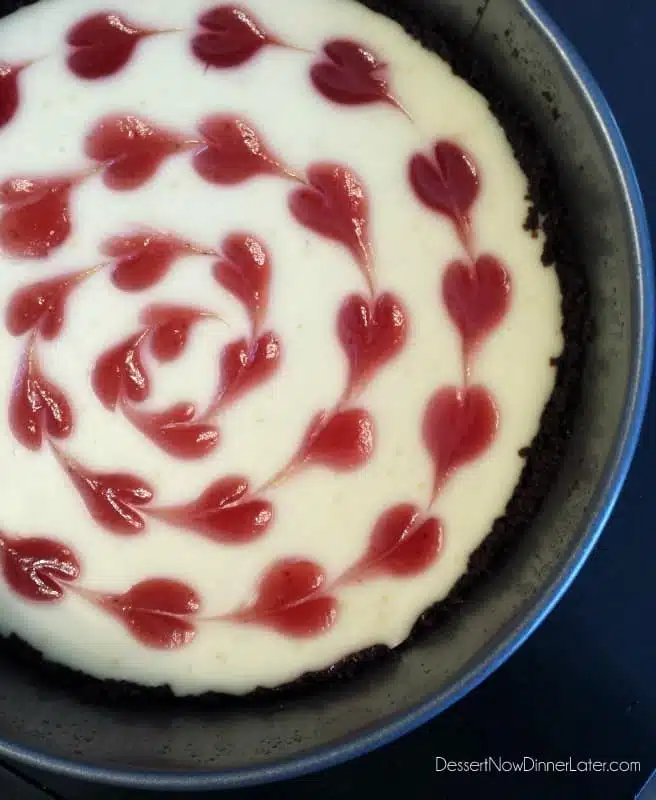
The original recipe wanted you to put the fruit sauce on the bottom of the crust and then add the cheesecake filling with the dots and heart swirl.
Well, it made the bottom of the crust soggy, so when I went to move it off the bottom of the springform pan, it cracked where some of the hearts were. Bummer!
I have updated the recipe for you all so you should not have problems with soggy crusts or cracking! Enjoy!
MORE CHEESECAKE RECIPES
- Caramel Apple Cheesecake Bars
- Cheesecake Recipe
- Tangy Lemon Cheesecake Bars
- Mini Red Velvet Cheesecake
- Fruit Cheesecake Bars
- Mint Oreo Cheesecake Bars
- Pumpkin Swirl Cheesecake Bars
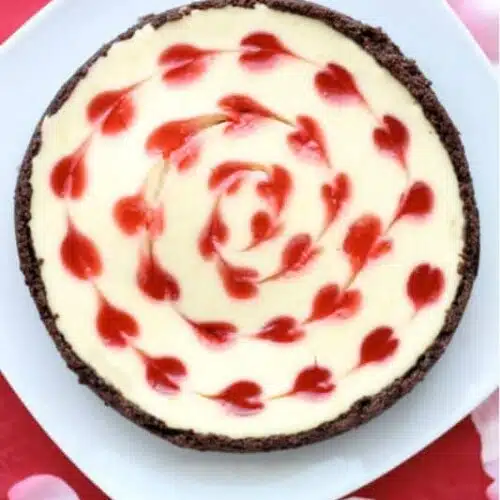
Valentine’s Day Cheesecake
Ingredients
Crust
- 9 sheets chocolate graham crackers , (1 sleeve; about 1 1/3 cups crumbs)
- ¼ cup (50 g) granulated sugar
- 8 Tbsp (113 g) unsalted butter, melted
Cheesecake Filling
- 12 oz (339 g) cream cheese, room temperature
- ½ cup (100 g) granulated sugar
- ½ cup (120 g) sour cream, room temperature
- 1 tsp lemon juice
- 2 tsp vanilla extract
- 1 large egg, room temperature
Strawberry Puree
- 10 oz (280 g) frozen whole strawberries, about 2 cups
- 1 cup (200 g) granulated sugar
- ¼ cup (59 ml) lemon juice
- 1 Tbsp cornstarch
- 1 Tbsp COLD water
Equipment
Instructions
- FOR THE CRUST: Preheat oven to 350˚F. Pulse the chocolate graham crackers in a food processor until fine crumbs. Empty crumbs into an 8-inch springform pan. Add the sugar and melted butter. Mix together until all the crumbs are wet, then press onto the bottom and 1½ inches up the sides of the pan.
- Bake at 350˚F for 12 minutes. Remove from oven and set aside to cool. LOWER THE OVEN to 280˚F.
- FOR THE STRAWBERRY PUREE: In a medium saucepan, cook the strawberries, sugar, and lemon juice over medium heat, stirring frequently, until it's starting to boil, the strawberries are soft enough to break up with a spatula, and the sugar is dissolved. Transfer the strawberry mixture to a blender and process until smooth.
- Strain the mixture over a wire sieve back into the pot. Continue cooking over medium heat, stirring frequently.
- In a small bowl, combine the cornstarch and COLD water, creating a slurry. Wait until the strawberry puree comes to a boil, then stir in the cornstarch slurry. Let it come to a rolling boil and thicken up, stirring constantly.
- Remove from heat and place the saucepan on a hot pad in the fridge until cool to the touch.
- FOR THE CHEESECAKE FILLING: Using an electric stand mixer with the paddle attachment, beat the cream cheese and sugar together until creamy and smooth. Scrape the bowl.
- Add the sour cream, lemon juice, and vanilla. Mix again until smooth and fully combined, scraping the bowl as needed. Add the egg and mix until well combined.
Assembly
- Prepare cheesecake for baking in a water bath by wrapping the outside of the springform pan with a double layer of heavy duty foil. Spread the cheesecake batter into the chocolate crust. Gently jiggle and tap the pan to even out the top and release any air bubbles.
- Pour the strawberry puree into a squeeze bottle with a tiny tip. Drop small dots an inch or so apart in a spiral pattern over the cheesecake batter, piping larger dots on the outside, and smaller dots as you go in towards the middle. Save the extra strawberry puree for serving.
- Take a toothpick or sharp pointy knife and drag it through the center of each circle in the same spiral pattern. Be careful NOT to lift the toothpick or knife until you have finished the very last circle. (I started with the outside and worked my way to the middle.)
- Place the cheesecake into a slightly larger roasting pan or baking dish and place it in the oven. Carefully pour hot water halfway up the sides of the springform pan.
- BAKE at 280˚F for 55-60 minutes, until the top looks dull/matte and is slightly puffed up. DO NOT OPEN THE OVEN. Turn the oven off and keep the cheesecake in there for 2 hours.
- Remove cheesecake from oven, take the foil off the pan and let it finish cooling in the refrigerator for 2+ hours. Once chilled, cut the cheesecake with a hot, dry knife for crisp, clean slices. Serve with extra strawberry puree.
Notes
- Store cheesecake covered lightly with plastic wrap in the refrigerator for up to 7 days.
- To freeze, double wrap the cheesecake with plastic wrap onto a cardboard round or freezer-safe plate and then wrap with a layer of foil. Freeze up to 3 months. Thaw in the refrigerator overnight. NOTE: Strawberry hearts may crack upon freezing/thawing.
Nutrition
Did you make this?
Don’t forget to leave a rating below and make sure to follow on Pinterest and Instagram for more!
*Originally published 2/6/2014. Post updated December 2023.



It looks so pretty and scrumptious! Your heart pattern is just perfect 🙂
Thanks! It was one of my favorite desserts to make since it is so cute.
Hi Amber !
I am dropping by from Totally Tasty Tuesday. Your cheesecake looks beyond gorgeous.
I am a host of the linky party Tasty Tuesday and would love if you share this cake with us.
http://myniche-myspace.blogspot.com/2014/02/tasty-tuesday-48-hearty-meal-edition.html
Hope you’ll join us. Have a great week !
Oh your cheesecake looks wonderfully delicious! 🙂 I also made a cheesecake today for my wife, it is part of her Valentine’s Day present from me!
check out my post too!
Michael 🙂
This looks so GOOD! So pretty too! Can’t wait to try it.
Thanks! It was so fun to make!
Cheesecakes are perfect for Valentine’s day! It just makes everything extra special! Looks great!
Thanks Nancy! The hearts are super easy to make too, but gives it that extra touch.
I’ll NEVER say no to cheesecake, and this is no exception. Those hearts? ADORABLE!
Thanks Kaylynn! I think fell the same way 🙂
Thi sis so pretty! Cheese cake is my hubs fave too
oh my goodness, you are right. This is totally dreamy. I wish I could make and eat it right now for breakfast… I guess it’ll have to wait till next week!
I am not going to lie, I pretty much ate 2/3 of this this myself! Ha! You should for sure make it!
This is adorable! Cheesecake is my husbands favorite and I’ve never made it for him, but this year may just have to be the year!!
Wow – it’s not even 6:30 am and my mouth is watering for this yummy delicious looking cheesecake! It’s so pretty!