Scotcharoos
Soft and chewy peanut butter krispie treats with a chocolate butterscotch topping.
Yields 15 bars
Ingredients
- 6 cups (160 g) Rice Krispies cereal
- 4 Tbsp (57 g) butter, unsalted or salted
- 1 cup (200 g) granulated sugar
- 1 cup (237 ml) light corn syrup
- 1 cup (264 g) creamy peanut butter, like Jif or Skippy
Topping:
- 1 cup (170 g) semi-sweet chocolate chips
- 1 cup (170 g) butterscotch chips
- 1 tsp oil, optional, for thinning (canola/vegetable/coconut)
Instructions
- Measure the Rice Krispies into a very large bowl. Spray a 9×13-inch baking dish with cooking spray and set it aside.
- Place the butter, sugar, and corn syrup into a large saucepan.
- Cook over medium-low heat, stirring frequently, until the mixture is hot, but NOT boiling, and the sugar is dissolved. (It may come to a light simmer and bubble at the edges, but as soon as that happens remove it from the heat immediately. The mixture will also change from thick and gritty, to thin and runny.)
- Remove mixture from heat and add the peanut butter. Stir until the peanut butter melts and the mixture looks cohesive.
- Pour the peanut butter mixture over the crispy rice cereal and stir until the Rice Krispies are coated evenly. Empty the peanut butter Rice Krispies into the prepared pan and spread into an even layer. OPTIONAL: Use wax paper and a mini rolling pin, or your hands, to flatten the top. (This helps the topping spread smoother.)
- FOR THE TOPPING: Place the chocolate chips, butterscotch chips, and oil (optional) in a heat-safe bowl. Microwave at half power in 20 second increments, stirring in-between each interval, until fully melted and smooth.
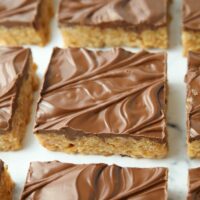
- Pour the melted chocolate over the top of the peanut butter rice krispie treats. Use an offset spatula to spread the chocolate evenly over the pan. (Use this tutorial for swirled icing if you want yours to look like mine.) Allow the chocolate to set. Then cut into squares. TIP: Place pan in fridge for 15-20 minutes to help the chocolate set faster.
Notes
- Don’t like butterscotch? Use peanut butter chips or extra chocolate chips instead.
- Storage: Store in an airtight container at room temperature for up to 1 week. To freeze, place bars in a freezer-safe container with wax or parchment paper between the layers and freeze for up to 2-3 months.
Nutrition
Serving: 1 bar | Calories: 340kcal | Carbohydrates: 43g | Protein: 5g | Fat: 17g | Saturated Fat: 7g | Polyunsaturated Fat: 3g | Monounsaturated Fat: 7g | Trans Fat: 0.1g | Cholesterol: 10mg | Sodium: 203mg | Potassium: 181mg | Fiber: 2g | Sugar: 30g | Vitamin A: 856IU | Vitamin C: 7mg | Calcium: 18mg | Iron: 4mg